Houdini to Maya (BGEO import/export)

I found this maya plugin that seems to work reasonably well for importing a BGEO sequence from Sidefx Houdini into Autodesk Maya.

You can download the plugin from here: http://www.houdinistuff.com/

The instructions provided in the readme file can be a bit confusing.  Here are the steps I used to successfully load a Bgeo sequence from houdini:

  1. Save the bgeo.mll file into your plugins folder and load it in maya.
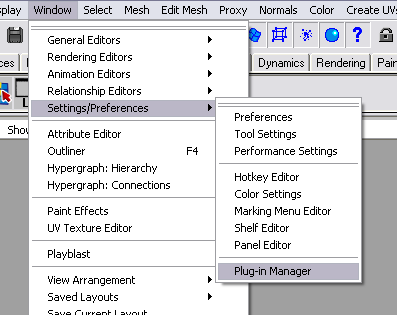
    mbeo_maya_plugin
  2. Open the command line editor and run: mBgeoReader
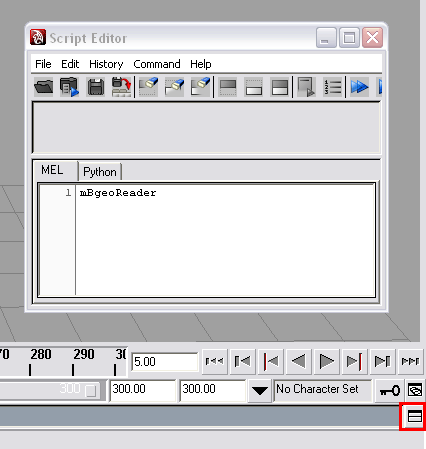
    mbgeo_maya_script_editor
  3. This will create a new poly object called mBgeoReader. Check in the outliner window.
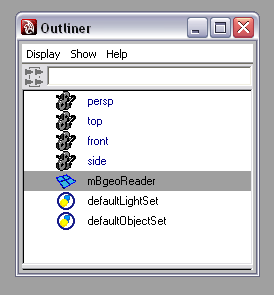
    mbgeo_maya_outliner
  4. Select the object and go to the attribute editor.
    mbeo_maya_attribute_editor
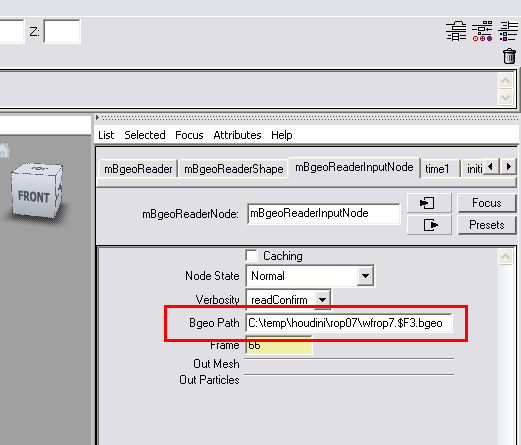
  5. Enter the Path to the bgeo files.
    mbeo_maya_bgeo_path
  6. Done. You can pan through the timeline to see the animation sequence.

I haven’t yet tried exporting a Bgeo sequence from Maya, but the import worked successfully. Some problems that you may run into are attributes like velocity that aren’t  transferred into the Maya scene. At least I haven’t been able to during my test run. If there is a way, let me know. Without the velocity attribute, I wasn’t able to produce an accurate motion blur in Maya.

It may be a good idea to turn off any attributes in Houdini before using the ROP output node to create the bgeo sequence. This should increase performance in Maya. Lastly, use the geometry cacheing in Maya to speed things up if needed.

Render WIREFRAME in Maya with Mental Ray

There are a few ways to render objects as wireframes in Maya. The first is to use the toon/Vector shader, but this method doesn’t work very well with non-polygon surfaces like nurbs. After some research, I found that contour rendering with mentalray works better and is much faster. This process also requires that you convert nurbs surfaces to polygons, but its a small nuance. You can use render layers in Maya and just add the duplicate objects there, instead of affecting the entire scene.

These instructions are for Maya 8.0 and above.

1. Make sure you have the Mental Ray plugin loaded.

If not, go to Window -> Settings/Preferences->Plug-in Manager
Then enable Mayatomr.dll

2. Create/Select your objects. I’m just using a polygon sphere.

3. Optional: Create a new render layer and add the objects here.

2. Apply a background shader to the object.

Use these settings:

Specular Color: black
Reflectivity: 0.000
Reflection Limit: 0
Shadow Mask: 0
Matte Opacity Mode: solid matte
Matte Opacity: 1

3. In the attribute editor view of the background shader above, select the right arrow at the top to go into the SHADING GROUP.

4. Now, in the attribute editor view of your Shading Group, expand the mental ray section. Then expand the Contours section.

Check ‘Enable Contour Rendering

5. Set the values for Color, Alpha, and Width. Color is the color of the wireframe lines. Alpha controls transparency of the lines. Width is the thickness of the lines.

I used these values:

Color: white
Alpha: 1
Absolute Width
Width: 0.5

6. Open the render globals window and go to the mental ray tab.

Expand the Contours section.
Expand the Contours->General section.
Check ‘Enable Contour Rendering’.

Expand the Contours->Quality section.
Set Over-sample to 3 (Higher values create smoother lines)

Expand the Contours->Draw Contours section.

Check ‘Around All Poly Faces’

Here is a wireframe screenshot using the Mental Ray contour line method above:

Here is an alternate method (toon/Vector shader) for generating wireframes in Maya:

[youtube]http://www.youtube.com/watch?v=UONmeh24xh4[/youtube]

FIX dull colors on Quicktime H.264 Video

Arguably one of the most annoying things about Apple Quicktime is that when you create a new file with h.264 compression, the colors look extremely washed out and dull. For instance, this happens when you export a file from Shake, After Effects, or other compositing programs. For the last year, I always thought it had to do with the h.264 compression that produced the dullness. However, when I played the same file with VLC player, the image looked fantastic. It never made sense, so I decided to revisit the issue and lo and behold there IS a solution to fix this.

  1. First and foremost, you need Apple Quicktime PRO.
  2. Open the QuickTime/h.264 file.
  3. Select “Window -> Show Movie Properties“.
  4. Select the video track, then click on the “Visual Settings” tab.
  5. On the bottom left part of the screen, you should see “Transparency” with a drop-down box.
  6. Select “Blend” from the menu then adjust the “Transparency Level” slider to 100%.
  7. Afterward, choose “Straight Alpha” from the same drop-down menu and close the properties window.
  8. Save the file.

At first, it might not look right, but move the slider on the timeline a bit and you should a much better looking image. Quicktime H.264 washed out colors demystified!!!

Update: 2008-10-11

I just realized that when you save the file above, the http streaming gets disabled for some reason. I was able to circumvent this by “Saving As” another file. But then the playback is no longer smooth.

If anyone knows a better solution for this let me know.